giovedì 9 febbraio 2012

Julian's light infantry and bowmen

Other small but very important additions to the Roman army at Strasbourg.
I have painted some light infantry units; in the battle line, they were deployed at the left wing of the Roman army, in front of the woods occupied by the Alamans.
All models are from Miniart.
I also painted some units of bowmen, who were deployed behind the heavy infantry first line in order to hit the incoming Alamannic hordes.
This time the most part of the models are from the relatively new Italeri set dedicated to the Late Imperial Legion (nr. 6137), a very nice set indeed.


martedì 7 febbraio 2012

Romans vs Carthaginians

A couple of days ago another test for my new improvements to the rules with Gianni.
This time the focus was on the manipular tactic, so the choice was almost mandatory: Romans against Carthaginians!
The composition of the armies was quite typical: medium iberian infantry, gallic warbands, heavy african phalanx and lots of medium and light cavalry for the Carthaginian, massive heavy legionary infantry, few medium cavalry and some light cavalry for the Roman.

Carthaginian army
Roman army


The deployment of the armies was also quite traditional: the Carthaginian general placed the Iberians and the Celts slightly forward, in order to get the first strike, and he left the phalanx just behind for the second hit; the medium cavalry was massed on the left, skirmishers and light cavalry on the right, near the small hill (Carthaginians left in following picture).
The Roman general followed the same tactical concept and placed the two lines of legionary infantry (hastati and principes) in the centre, and cavarly and skirmishers at the wings in order to face their african counterparts (Romans right in picture).


The battle began with the African cavalry charging the Roman medium cavalry, the latter heavily outnumbered.
Near the hill, the opposite skirmisher began to fight each other, while the Carthaginian light cavalry decided to move toward the opposite wing, in order to support the medium cavalry.


In the centre, the first line of the legions moved against the Iberians and the Gauls and, after a short while, the clash happened; the first contact was balanced, with the barbarian heat causing some problem to the Roman first line.


At the left wing of Roman army, the Roman cavalry was very soon disbanded and routed by the Iberian, African and Celtic cavalry.


While the Carthaginian cavalry tried to regroup after the victorous battle, in the centre the legions began to do their job: the maniples in the second line rushed in battle one by one and for the Iberian and the Celts there was no escape and they began to retreat.

 
The Carthaginian phalanx moved against the Roman lines, in order to avoid the total collapse of the centre in the hope of a quick arrival of the victorious cavarly against the back of the roman lines.


For a short while, the phalanx tried also to extend its front in order to avoid surrounding, but in the very centre the Iberians and the Celts didn't resist anymore, so the legions were able to pivot to their left and to attack the flank of the phalanx.


This was the end of the phalanx and of the battle.
Oppositely to what normally happened in the first part of the Second Punic War, here the Romans were able to break the centre of the Carthaginian army before the returning in the field of the African cavalry.
As you can see in picture, the cavarly was very near to arrive, but just a bit too late ...


Another very balanced battle, with the Romans that won but not without fear; they lost some important units (the whole cavalry and some legionary units) and the Carthaginian too was very near to win.

During the battle, the balance of the rules concerning the manipular support has been a matter of debate between Gianni and me; probably I will slightly modify the rules in order to make less effective the support of the second roman line.
But the system is working very well: now deploying an army in two lines makes sense!

venerdì 20 gennaio 2012

Late Romans vs Alamans

Two days ago, with my friend Gianni, I have played a fictional battle (15 mm.) between late Romans and Alamans with my rules "Magna Acies!".
The focus of the day was not simply to play a battle, but mainly to improve the rules in order to make worth deploying the army (expecially Roman army) in two ranks.
This is what I (the Roman) have made; instead, Gianni (the Alaman) has deployed the Alamans in massed formations, but one behind the other.
The picture below shows this, with the Romans on the left and the Alamans on the right:


The Alamannic warbands in the centre begin to push toward the legions which  face them:


The clash happens in the centre, while at the corners opposite light troops are skirmishing (left in picture) and Roman cavarly is prevented to attack due to the presence of a massive formation of Alamannic bowmen deployed before Alamannic cavalry (right in picture):


In the centre, Alamans are pushing very hard against Roman lines, and they are able to gain some important advantage breaking sometimes the Roman first line and forcing some Roman auxilia and bowmen to run away.
But the roman second line is fresh, and it can rush in battle and clash against the tired barbarians, supporting the first line, where still existing:


So, the Roman centre (legions and auxilia) is able to push back the Alamans, and the most important barbarian divison (which was fighting against legions) suddenly takes the flight:


Near the river, Roman cataphracts decide at last to charge the Alamannic archers (who run away) and to rush against Alamannic cavalry, suffering heavy casualties:


But we are at the end of the day: Alamans, after a first successful moment, are forced to gradually withdraw, loosing lots of warriors.
The protracted effort of the Roman lines has been able to guarantee Roman final victory!
This has happened when Alamannic player has lost half points of his army.


In coclusion, a very interesting and balanced battle, with a realistic and historical outcome.
After the typical, first barbarian heat, Roman discipline has been able to save the day, due to the deployment in depth of the Roman army.

sabato 19 novembre 2011

Lepanto 1571

Today a slightly different topic.
In a foggy day in Venice, we have refought the battle of Lepanto, which has been fought between the "Holy League" (including Genova, Venezia, Spain, the Pope, etc.) and the Turkish Empire in 1571.
We have used my rules "Capitano da Mar" (Captain of the Sea, the name of the Admiral in the Republic of Venice), which I have developed for this particular period of naval warfare between galleys.
The outcome of the battle has been surprisingly historical: the Christian right wing was near to collapse, but the centre of the Holy League was able to capture the enemy flagship and to kill the Turkish Admiral, Alì Pashà, then the Turkish fleet took the flight.
Very nice Langton models, owned by my friend Gianni.
Take a look!

The Turkish centre

The opposing fleets

The central match


Christian flagship

The outcome: the Turkish flagship burning!


mercoledì 5 ottobre 2011

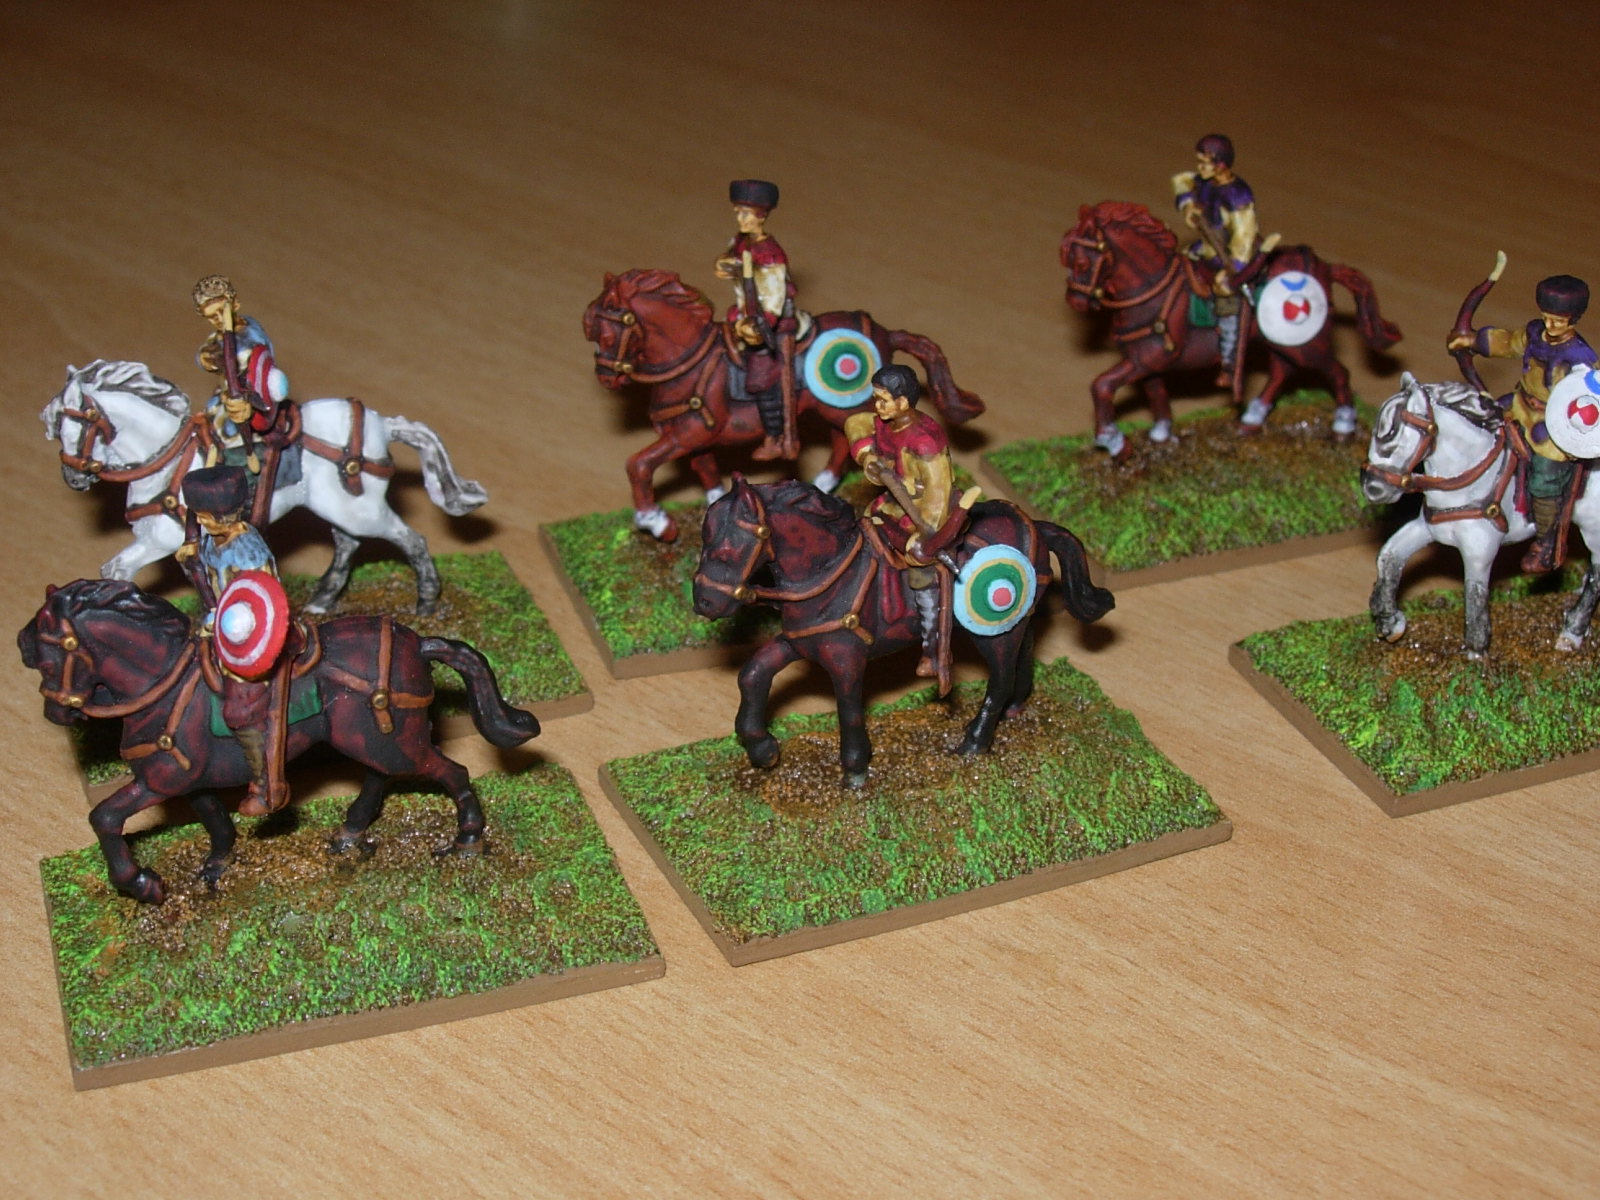
Julian's Roman Illyrian Cavalry

As I said in my previous article, after horse archers and cataphractaroi I've moved to the medium cavalry of the army of Julian.
I've used MiniArt models, which I consider far better than the Hat models, even if the sculpting is not so deep; however, in terms of anatomy and historical research the MiniArts are first class.
Unfortunately the mould was not so good, so I had to peel off a lot of excess plastic form the models. 
It seems that the most distinctive units of this kind were the so called "equites illyriciani", kind of troops raised in Dalmatia.
They probably were medium cavalry in the right meaning of this term: they were able to perform both fire at distance and shock tactics.
The "Notitia Dignitatum" lists at least two units which probably match with this kind of cavalry: the "Octavo Dalmatae" and the "Dalmatae Passerentiaci", both of them stationed in Gaul.


For this reason I have decided to represent the shield of these two units, to which I added the shields of a third unit, also stationed in Gaul: the "Honoriani Seniores".
I hope you'll like my pictures!


domenica 10 aprile 2011

Un po' di cavalleria romana

Ecco qualche foto dei miei primi lavori sulla cavalleria romana di Giuliano.
Sono tutti pezzi della famigerata Hat: catafratti e arcieri a cavallo.
Come ho già scritto in altro articolo, quanto a dimensioni sono molto diversi tra loro: ho dovuto "sollevare" gli arcieri perchè non sembrassero troppo i figli minorenni dei catafratti ...
Gli stessi arcieri, inoltre, sono un po' statici nelle pose e i cavalli sono forniti in due sole posizioni, molto simili tra loro e entrambe al "passo"; trattandosi di cavalleria leggera, che colpiva e fuggiva, decisamente meglio sarebbero state pose più dinamiche.
Gli scudi degli arcieri sono rigorosamente tratti dalla "Notitia Dignitatum" e sono il "Primo Sagittarii", "Secundo Sagittarii" e "Tertio Sagittarii", tutti dipendenti dal "Magister equitum praesentialis", sotto il comando diretto del  "Comes Africae".
Quindi, in realtà, probabilmente non facevano parte del "Comitatus" di Giuliano; il problema è che Giuliano a Strasburgo aveva sicuramente degli arcieri a cavallo (lo dice Ammiano), ma non mi è stato possibile individuare con certezza sulla "Notitia" unità di questo tipo in servizio in Italia o in Gallia.
Enjoy the pictures!


Seguirà la cavalleria media romana, ma per quella intendo avvalermi di pezzi della Miniart.

giovedì 10 marzo 2011

Cominciamo con l'esercito di Giuliano in 1/72!

Ora che siamo abbastanza a posto con i Germani (che dovranno impersonare di volta in volta Goti, Alamanni, Gepidi, Eruli ecc. ecc.), posso riprendere il mio lavoro iniziato tempo fa sull'esercito di Giuliano.
Egli, Cesare per l'Occidente dell'Imperatore Costanzo, inviato in Gallia a riportare l'ordine dopo le incursioni dei Franchi e degli Alamanni, sconfisse questi ultimi, agli ordini del re Cnodomario, nella famosa battaglia di Strasburgo del 357 d.C..
Vi suggerisco, al proposito, di leggere lo stupendo articolo di Wikipedia, completo e bellissimo (stavolta disponibile, uguale,  anche in italiano):


Una pagina della "Notitia Dignitatum"
Ammiano Marcellino, lo storico contemporaneo agli eventi che descrive la battaglia, riferisce solo alcuni nomi delle unità presenti sul campo, ma ci vengono in soccorso non solo altri storici minori, ma anche la "Notitia Dignitatum", il famoso manoscritto della fine del IV sec.d.C. che passa in rassegna tutte le cariche civili e militari del tardo impero romano.
Di circa 50 anni successiva, quindi, a Giuliano, ma molti particolari sembrano coincidere ancora.
Senza dilungarmi troppo, dirò che, incrociando il racconto di Ammiano con il testo della "Notitia", si evince che le unità romane di fanteria che presero parte alla battaglia erano tutte stanziate in Italia, erano sotto la giurisdizione del "Magister militum praesentialis" ed erano tutte o quasi unità d'elite, cioè "Legiones palatinae" o "Auxilia palatina".
Insomma, l'esercito di Giuliano non era certo numeroso (sembra non oltre i 15.000 uomini), ma in massima parte formato dalle migliori unità della parte Occidentale dell'Impero.
E la "Notitia Dignitatum ci fornisce anche il colore degli scudi di queste unità, quindi sotto con colori e pennelli!


Come figurini mi sono affidato anche in questo caso ai Romani della Miniart (set 72012 - Roman Infantry IV - V sec. a.D.); ottima ricerca storica e ottime posture, anche se i particolari non sono certo eccelsi a causa di una scarsa profondità nella scultura dei dettagli.
Vi mostro le foto di ciò che ho fatto finora, lasciando a successivi articoli tutto (o quasi ...) ciò che produrrò in seguito.

"Herculiani" (Legio Palatina)
"Ioviani" (Legio Palatina)
"Cornuti" (Auxilia Palatina)

"Brachiati" (Auxilia Palatina)
"Petulantes" (Auxilia Palatina)
"Heruli" (Auxilia Palatina)
"Batavi" (Auxilia Palatina)
"Celtae" (Auxilia Palatina)