Dopo qualche prova "in bianco", siamo finalmente riusciti a giocare una battaglia completa a "Magna Classis!", mettendo in campo uno scontro ipotetico tra due flotte di notevoli dimensioni nel Mediterraneo del XVI secolo.
Superfici di gioco cm 100x150.
Modelli Tumbling Dice in scala 1:2400.
Il punteggio concordato è stato di 180 punti flotta e 18 punti comando per parte.
La Santa Lega schiera 171 galee, così divise:
- Squadra spagnola: 1 capitana, 39 galee, al comando di Don Alvaro de Bazan (Ammiraglio, livello 5);
- Squadra veneziana: 1 Capitana, 49 galee, al comando di Ambrogio Bragadin (Capitano, livello 4);
- Squadra genovese: 1 Capitana, 49 galee, al comando di Andrea Doria (Capitano, livello 4);
- Squadra mista Cavalieri di Malta e pontificia: 1 Capitana, 29 galee, al comando di Pietro Giustiniani (Capitano, livello 4);
- Galeazza, al comando di Giovanni Loredan (Capitano, livello 1):
After a few "blank" tries, we finally managed to play a full battle at "Magna Classis!", fielding a hypothetical clash between two large fleets in the Mediterranean in the 16th century.
Playground cm 100x150.
Models Tumbling Dice 1:2400 scale.
The score agreed was 180 points and 18 fleet command points on each side.
The Holy League ranks 171 galleys, so divided:
- Spanish Squadron: 1 captain, 39 galleys under the command of Don Alvaro de Bazan (Admiral, level 5);
- Venetian Squadron: 1 Capitana, 49 galleys under the command of Ambrogio Bragadin (Captain, level 4);
- Genovese Squadron: 1 Capitana, 49 galleys under the command of Andrea Doria (Captain, level 4);
- Mixed Squadron (Knights of Malta and Pontifical): 1 Capitana, 29 galleys under the command of Pietro Giustiniani (Captain, level 4);
- Galleass, commanded by Giovanni Loredan (Captain, level 1):
La flotta turca è invece costituita da 230 galee, così distinte:
- Squadra di Istanbul: 1 capitana, 59 galee, al comando di Alì Pascià (Ammiraglio, livello di comando 6);
- Squadra di Alessandria: 1 capitana, 59 galee, al comando di Mehmet Scirocco (Capitano, livello 5);
- Squadra di Algeri: 1 capitana, 59 galee, al comando di Hassan Bey (Capitano, livello 4);
- Squadra di Tripoli: 1 capitana, 29 galee, al comando di Kebir Bey (Capitano, livello 2);
- Squadra di Negroponte: 20 galee, al comando di Mustafà Esdri (Capitano, livello 1):
The Turkish fleet is composed of 230 galleys, so distinct:
- Squadron of Istanbul: 1 capitana, 59 galleys, commanded by Ali Pasha (Admiral, command level 6);
- Squadron of Alexandria: 1 capitana, 59 galleys, commanded by Mehmet Scirocco (Captain, level 5);
- Squadron of Algiers: 1 capitana, 59 galleys under the command of Hassan Bey (Captain, level 4);
- Squadron of Tripoli: 1 captain, 29 galleys, commanded by Kebir Bey (Captain, 2 level);
- Squadron of Negroponte: 20 galleys, commanded by Mustafa Esdri (Captain, level 1):
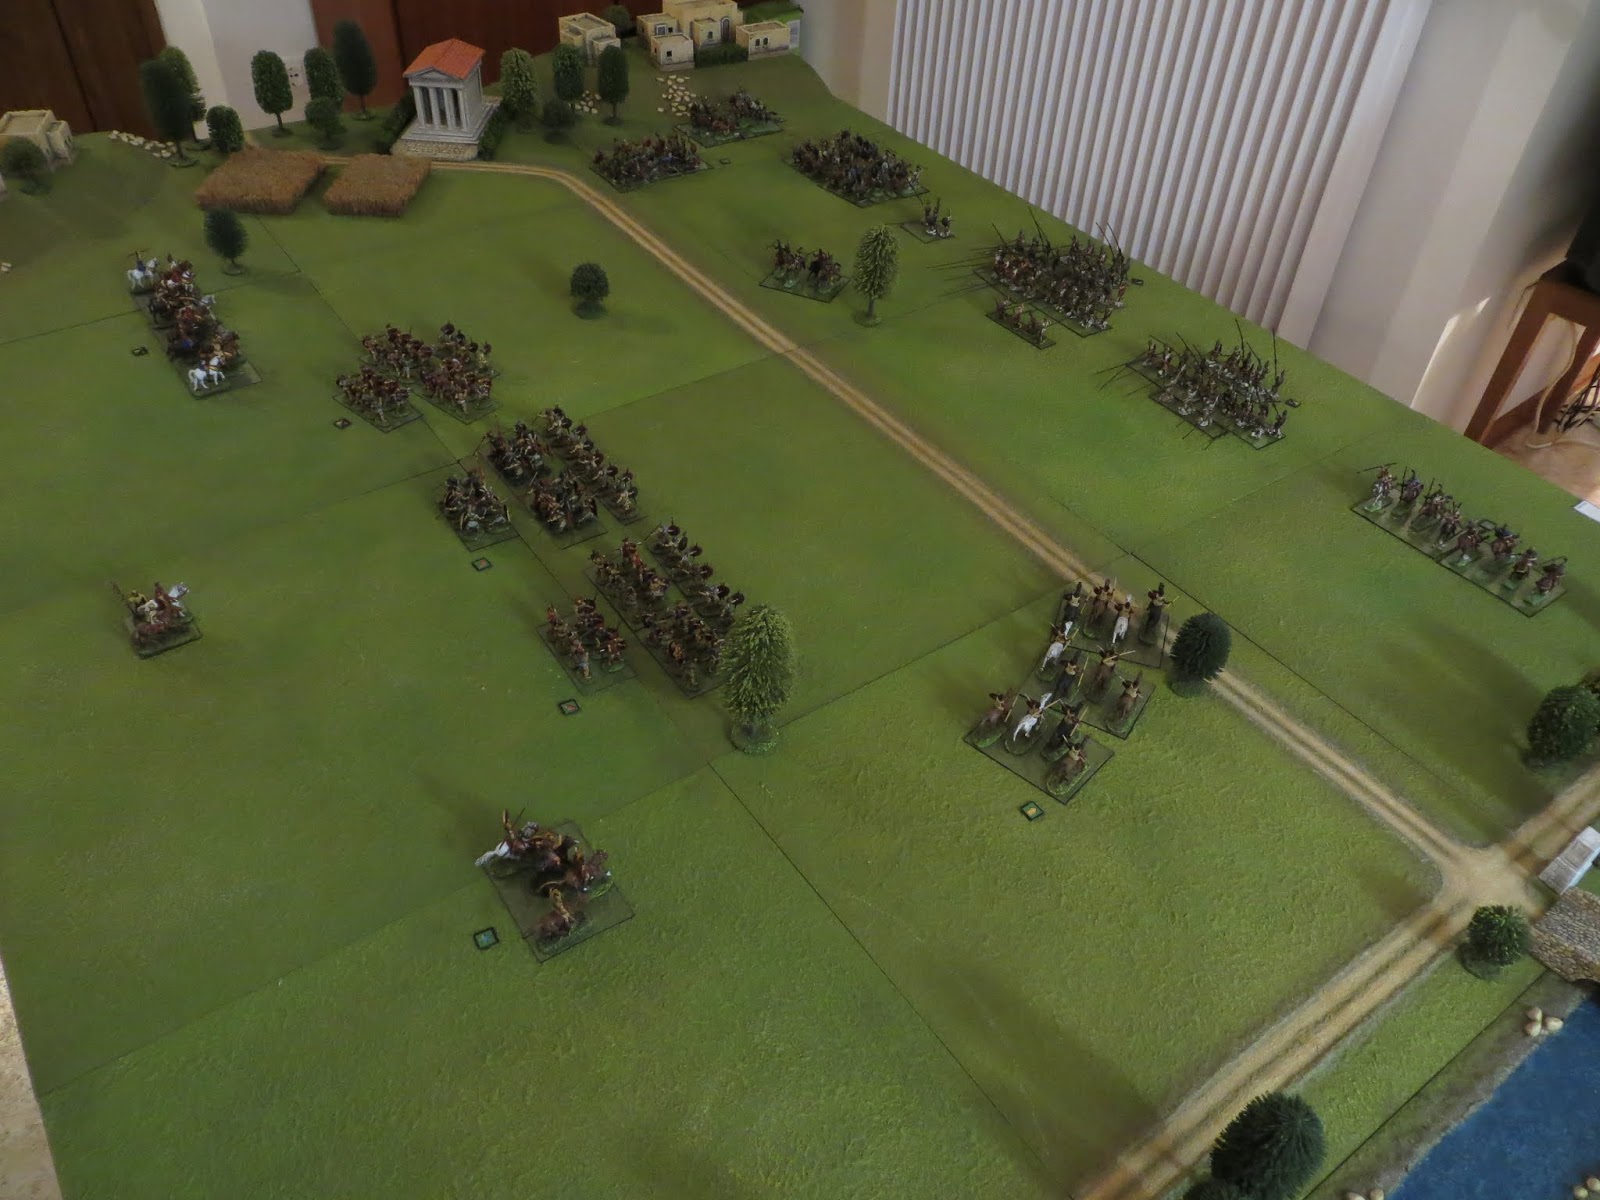
Le due flotte si schierano lentamente, per squadre, una di fronte all'altra, fuori dal tiro dei cannoni di corsia nemici.
Il Turco è schierato a sinistra, con la grande Squadra di Istanbul dell'Ammiraglio al centro, le due squadre minori in alto e le altre due squadre più numerose (di Alessandria e di Algeri) in basso nell'immagine.
La Santa Lega è a destra del campo, schierata piuttosto uniformemente con la Squadra spagnola al centro, preceduta dall'unica galeazza, la Squadra veneziana in basso, quella genovese in alto e la Squadra mista maltese e pontificia leggermente arretrata, in riserva, tra la Squadra spagnola e quella genovese:
The two fleets align themselves slowly, for squadrons, facing each other, shooting out of the guns of enemy lane.
Turkish is lined up on the left, with the great squadron of Istanbul of Admiral in the Middle, the two smaller squads at the top and the other two squads more numerous (of Alexandria and Algiers) at the bottom of the image.
The Holy League is at the right of the field, lined up fairly evenly with the Spanish squadron at the Centre, preceded by the one galleass, the Venetian squadron down, that genovese on top and the mixed team maltese and Pontifical slightly set back, in the reserve, among the Spanish squad and that genovese:
Le due flotte schierate si guardano poco prima del segnale d'attacco, con le Squadre di Tripoli e Negroponte in primo piano:
The two fleets deployed as they look just before the attack signal, with squadrons of Tripoli and Negroponte spotlight:
L'ala destra turca, dalla parte della costa, con le Squadre di Algeri e di Alessandria che fronteggiano la Squadra veneziana:
Turkish right wing, on the side of the coast, with squadrons of Algiers and Alexandria that face the Venetian squadron:
Al segnale, la flotta turca (a sinistra) inizia a muovere verso la linea cristiana (a destra); più velocemente al centro e in basso, con le tre squadre più numerose; più cautamente in alto, con le due squadre meno consistenti:
At the signal, the Turkish fleet (left) starts to move toward the Christian line (right); faster in the middle and bottom, with the three squadrons more numerous; more gingerly on top, with the two squads less consistent:
Le squadre della Santa Lega (a destra) rispondono in maniera del tutto opposta: in alto, la Squadra genovese e la riserva avanzano rapidamente, mentre al centro dello schieramento cristiano l'avanzata è appena accennata, con la galeazza che si sposta per frapporsi tra le due squadre turche in avanzata.
In basso nell'immagine, la Squadra veneziana, che vede davanti a sé le due squadre turche di Algeri e e di Alessandria, assai numerose, preferisce invece restare ferma e non accorciare le distanze:
The squadrons of the Holy League (right) meet in a totally opposite direction: up, the Genoese and the reserve Squadron are advancing rapidly, while the center of the grid is barely hinted at, with the advance Christian galleass that moves to stand between the two Turkish squadrons advanced. At the bottom of the image, the Venetian squadron, which sees before him the two Turkish squadrons of Algiers and Alexandria, very numerous, prefers to stay still and not close the gap:
Il Turco stringe ancora le distanze su tutto il fronte.
In alto, la piccola Squadra di Negroponte cerca sbarrare la strada alla riserva maltese e pontificia, mentre la Squadra di Tripoli e la Squadra genovese si scambiano i primi colpi di colubrina a lunga distanza.
Al centro, la grande Squadra di Istanbul (con l'Ammiraglio) si avvicina alla galeazza, che apre il fuoco.
In basso, la Squadra di Algeri è ormai prossima alla Squadra veneziana, mentre la Squadra di Alessandria, agli ordini di Mehmet Scirocco, inverte la rotta e punta verso il centro dello schieramento, probabilmente con l'idea di aiutare l'ala sinistra della flotta turca (che si trova in inferiorità):
The Turk still tightens the distances on the whole front.
At the top, the small squadron of Negroponte search bar the road to the reserve maltese and Pontifical, while the squadron of Tripoli and the Genoese Squadron will exchange the first shots of culverin at long range.
At the Centre, the great squadron of Istanbul (with Admiral) approaches the galleass, which opens fire. At the bottom, the squadron of Algiers is now next to the Venetian squadron, while the squadron of Alexandria, under orders from Mehmet Scirocco, reversed course and points toward the center of the grid, probably with the idea of helping the left wing of the Turkish fleet (which is in inferiority):
La Squadra di Tripoli apre il fuoco contro i Genovesi:
The squadron of Tripoli opens fire against the Genoese:
Tutte le Squadre che si trovano a distanza ravvicinata, o quelle che sono distanti, ma che ancora si stanno studiando, aprono il fuoco contro il nemico.
Al centro dello schieramento cristiano, tra le squadre turche che avanzano, in mezzo al fumo si nota la galeazza che spara a prua, ma anche sui lati:
All squadrons that are very close, or those that are far apart, yet still are studying themselves, opened fire against the enemy.
At the center of the Christian order, between Turkish squadrons advancing, in the smoke you notice the galleass that shoots forward, but also on the sides:
Il fuoco della flotta cristiana è notoriamente più accurato rispetto a quello dei Turchi, e la flotta musulmana subisce, come prevedibile, le prime perdite.
Ma al centro la Squadra di Istanbul attacca la galeazza isolata; Don Alvaro è costretto a contrattaccare con la Squadra spagnola per dare sostegno alla grande nave veneziana che, benché poderosa, non potrebbe sostenere da sola un attacco prolungato di molte galee turche.
In basso, anche la Squadra veneziana e la Squadra di Algeri entrano a contatto, con la Squadra di Alessandria che cambia ancora rotta e pare nuovamente intenzionata a sostenere l'attacco contro i Veneziani:
The focus of the Christian fleet is notoriously more accurate than that of the Turks, and the Muslim fleet undergoes, as expected, the first losses.
But at the centre Istanbul's squadron attacks the galleass isolated; Don Alvaro is forced to counterattack with the Spanish side to give support to the great Venetian ship which, while powerful, could not sustain a prolonged bout of many galleys. At the bottom, the Venetian squadron and the squadron of Algiers come into contact, with the squadron of Alexandria which changes still route and seems back intending to support the attack against the Venetians:
Al centro della battaglia, la Squadra di Istanbul dell'ammiraglio turco Alì Pashà abborda la galeazza e la Squadra spagnola del comandante cristiano Don Alvaro de Bazan giunta in supporto:
At the centre of the battle, the squadron of Istanbul of the Turkish Admiral Ali Pashà tackling the galleass and Spanish squadron of the Christian Commander Don Alvaro de Bazan in support:
In alto, i Genovesi indugiano nell'attaccare la piccola Squadra di Tripoli (che ha subito perdite dal fuoco) e i Maltesi - Pontifici ancora non serrano contro la Squadra di Negroponte.
Al centro, la Squadra di Istanbul ha i suoi problemi contro la galeazza e contro la Squadra spagnola.
In basso, la mischia tra la Squadra di Algeri e la Squadra di Venezia è piuttosto incerto, ma le galee veneziane, maneggevoli e bene armate, non sono così ben equipaggiate per il corpo a corpo, e iniziano a soffrire.
Dietro di loro, la Squadra di Alessandria indugia, ancora disimpegnata:
At the top, the Genoese linger in attacking the small squadron of Tripoli (who suffered losses from the fire) and the Maltese-Pontifici still do not close against the squadron of Negroponte.
At the Center, the squadron of Istanbul has its problems against the galleass and against the Spanish side.
At the bottom, the melee between the squadron of Algiers and the squadron of Venice is rather uncertain, but the Venetian galleys, agile and well armed, are not as well equipped for close combat, and begin to suffer. Behind them, the squadron of Alexandria lingers, even disengaged:
Al centro la Squadra di Istanbul dell'Ammiraglio Alì Pashà sta avendo la peggio contro galeazza e Spagnoli, due ossi duri nella mischia.
In basso, invece i veneziani subiscono gravi perdite contro Algeri:
In the centre, the Istanbul's squadron of Admiral Ali Pashà is having the worst against galleass and Spaniards, two Arseholes into the fray. At the bottom, instead, the Venetians suffer heavy losses against Algiers:
Mentre in alto le squadre genovese e maltese - pontificia vanno finalmente all'assalto delle meno numerose squadre turche (già colpite dal fuoco), al centro la Squadra di Istanbul è ridotta al minimo e l'ammiraglia di Alì Pashà è in grave pericolo.
Dato che, in basso, la Squadra di Algeri sembra riuscire da sola ad avere la meglio contro i Veneziani, Mehmet Scirocco decide (finalmente!) di portare la Squadra di Alessandria contro il fianco della galeazza:
While at the top Genoa and Maltese-Pontifical squadrons are finally the onslaught of less numerous clubs of Istanbul (already affected by fire), in the centre Istanbul's squadron is reduced to a minimum and the flagship of Ali Pashà is in grave danger. Given that, at bottom, the squadron of Algiers seem alone in having the best against the Venetians, Mehmet Scirocco decides (finally!) to lead the squadron of Alexandria against the flank of the galleass:
I Turchi, però, subiscono ora perdite gravissime, sia in alto, sia al centro, mentre in basso la situazione è più equilibrata:
The Turks, however, suffer serious losses, both at the top, as at the center, while below the situation is more balanced:
La galeazza, attaccata sul fianco dalla Squadra di Alessandria, inizia a soffrire e deve rivolgersi contro il nuovo nemico, lasciando la Squadra spagnola a combattere contro l'ammiraglia di Alì Pashà e quel poco che rimane della Squadra di Istanbul:
The galleass, attached on the side by the squadron of Alexandria, began to suffer and have to go against the new enemy, leaving the Spanish side to fight against the flagship of Ali Pashà and what little remains of the Istanbul Squadron:
Mehmet Scirocco divide ora la sua squadra e ne dirige metà contro la Squadra di Venezia, che è già ridotta ai minimi termini ma che ancora si difende:
Mehmet Scirocco divides now his squadron and directs half against the Squadron of Venice, which has been already reduced to lowest terms but that still defends himself:
Ma per i Turchi è troppo tardi.
In alto, la Squadra di Genova ha avuto ragione della Squadra di Tripoli, come la Squadra maltese - pontificia ha annientato la Squadra di Negroponte.
Al centro, mentre la galeazza combatte e soffre, la Squadra spagnola ha vinto sulla Squadra di Istanbul e ha catturato l'ammiraglia di Alì Pashà.
In basso, la Squadra di Venezia sarebbe senz'altro destinata a soccombere, contro ciò che resta della Squadra di Algeri e contro mezza Squadra di Alessandria giunta a sostegno, ma i Turchi hanno perso più della metà della loro forza, e arriva per le poche galee superstiti il segnale della ritirata:
But for Turks it is too late.
At the top, the squadron of Genoa was right of the squadron of Tripoli, as the Maltese - Pontifical squad has annihilated the squadron of Negroponte.
In the Center, while the galleass fights and suffers, the Spanish squadron won the squadron of Istanbul and captured the flagship of Ali Pashà. At the bottom, the squadron of Venice would undoubtedly destined to succumb, against what is left of the squadron of Algiers and against half the squadron of Alexandria which came to support, but the Turks have lost over half of their force, and the retreat signal comes to the few survivor galleys:
Siamo piuttosto soddisfatti di questa prima prova.
In circa tre ore, a ritmo molto blando, abbiamo giocato una battaglia navale tra galee piuttosto complessa, che ha simulato circa 400 navi in campo.
La vittoria della Santa Lega è stata dovuta essenzialmente al fatto che la Squadra di Alessandria ha tentennato troppo a lungo ed è entrata in azione tardi, quando le sorti della battaglia erano ormai segnate.
Lo scontro, quindi, avrebbe potuto avere un epilogo del tutto diverso.
In sostanza, il Cristiano ha una superiorità in artiglieria, mentre il Turco è superiore nel corpo a corpo, quindi per il primo è importante usare bene i suoi cannoni al momento giusto e il più possibile, mentre per il secondo è importante portare tutte le sue navi in mischia nelle migliori condizioni possibili.
Direi che la struttura del nuovo regolamento mi ha soddisfatto, perché sembra restituire un buon feeling con la situazione "reale" (almeno per come ci è pervenuta e per come rappresentata dagli studiosi).
Ora si può senz'altro lavorare su mille particolari e sul bilanciamento, se necessario (ma occorrono altre prove).
We are quite happy with this first test.
In about three hours, very bland, we played a naval battle between galleys rather complex, which simulated about 400 ships on the pitch.
The victory of the Holy League was essentially due to the fact that the squadron of Alexandria has hesitated too long and came into action late, when the tide of battle had been marked.
The clash, then, could have had a completely different outcome.
In essence, the Christian has a superiority in artillery, while Turkish is higher in combat, so for the first it is important to use his guns at the right time and as much as possible, while for the second is important to bring all its ships in melee at the best possible conditions.
I would say that the structure of the new regulation pleased me because it seems to return a good feeling with the "real" situation (at least as survived and as represented by scholars).
Now we can definitely work on a thousand details and balancing if needed (but we need other playtesting).


